By now, we have a strong piece of thoroughly wet hide tighly stretched onto a steel ring. There are only three things left to do before we can call it a shime head: stitching it to the ring, trimming the excess hide off--the part that has the mimis--and cutting holes around the perimeter so it can be laced to a drum body.
This is my very first time making shime heads, although I've built other drums, including chudaiko, so I didn't get all the details right on the first try. Such is life. Hopefully we all survive a few mistakes and we learn something through our efforts.
The main challenges of stitching are that--to get a stitch through the hide, you have to make a hole in the hide to pass the needle through. After the stitching is done, you don't want to have a bunch of big holes where the stitches are. I made a couple of choices about stitching based on this basic compromise: I do the stitching while the hide is still wet and I use a punch to make the holes. If I used a drill, I would be removing little bits of hide where I drill. By using a punch, I make a hole without removing any material; the punch just pushes the hide to the sides. As it dries, a punched hole closes itself back around the stitch.
That led to another compromise situation. A punched hole in wet hide doesn't stay open for very long, so I punched, then stitched each stitch one by one. Punch, stitch, punch, stitch, repeat. I didn't count all the stitches, but it had to be a good 200 or so. The first head took over three hours to stitch this way. For the second one, I had it down to just over two hours.
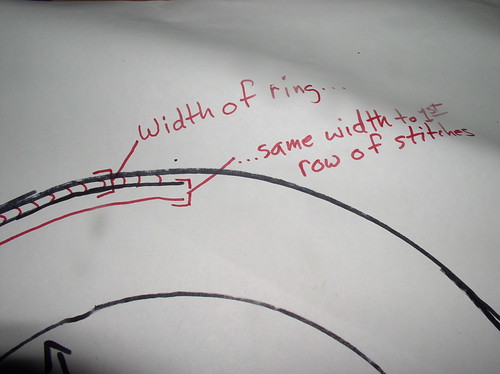
A shime head needs one strong row of stitching close to the inside of the ring, but that row can't be TOO close to the ring or the front and back parts of the hide won't draw together. The width of the ring will keep them apart (no editorial comment here about wedding rings doing the same). The distance between the inside of the ring and the outer row of stitches should be approximately equal to the thickness of the ring i.e. since I'm using a ring made of 3/8-inch steel, I have to make my first row of stitches 3/8 of an inch away from the inside of the ring.
Two other factors come into play: this same area where the stitching is will also have the holes cut into it for the ropes to go through to tie the head to a body. The ropes need to be close to the edge without cutting through the stitching. The other factor is that this 14-inch head will go on a 10-inch drum body, so the distance between the outside of the ring and the outside of the body will be two inches all the way around (10-inch body+2 inches on all sides=a 14-inch overall diameter).
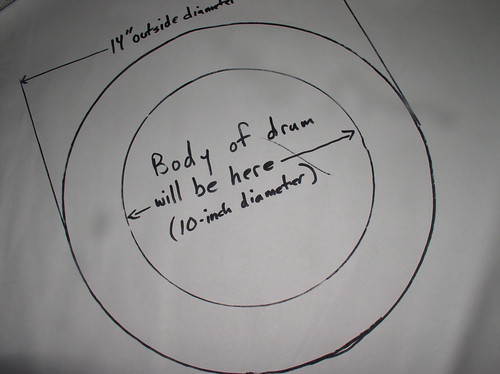
So...there's room for stitching and for a drum body with pull-ropes, but there is JUST ENOUGH room; neither too little nor too much.
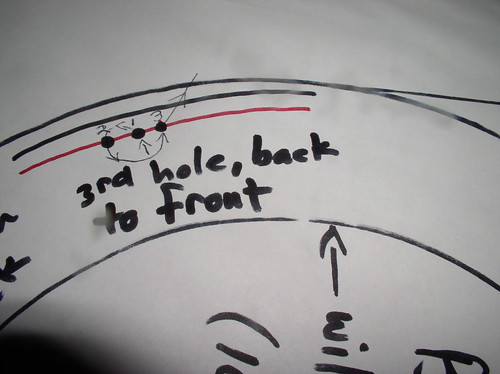
I use artificial sinew for stitching because it's very strong for its size and it comes in big rolls so I can use a piece that's long enough to go all the way around without making any unnecessary extra knots. I punch the first hole, then a second one about 1/4-inch away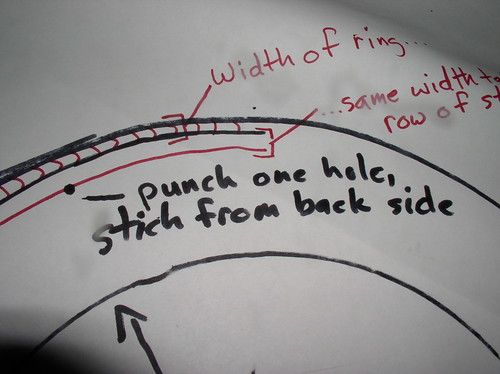
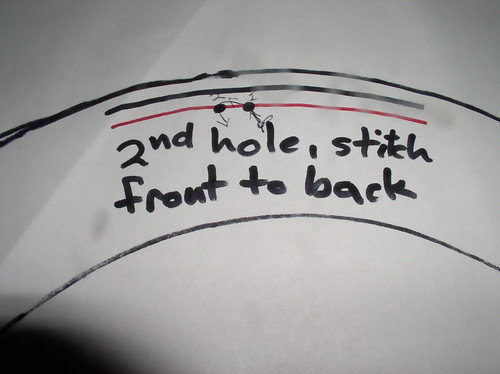
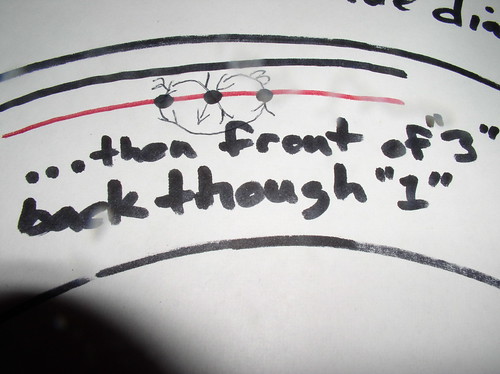
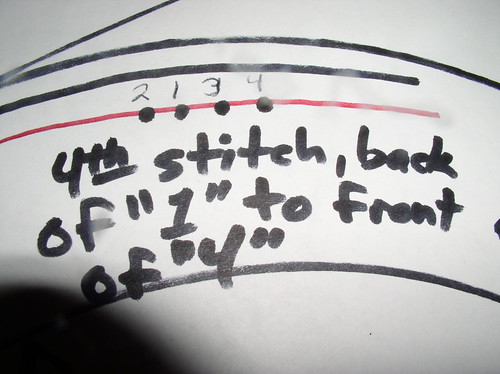
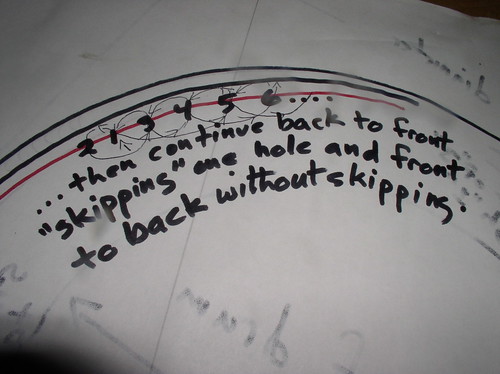
I cut a piece of sinew about 18 feet long because I know it will take about three times the circumference of the head by the time I double each stitch. I tie a slipknot it one end of the sinew and put a small piece of dowel into the loop of the slipknot so I can pull it tight to the hide without losing the knot. I make the first stitch from the back side of the head, then back through the second hole (front to back) then make another punch on the opposite side of the first stitch. After that, I punch/stitch in a continuous line so that from the back side, I skip a hole each time and loop each stitch back on itself from the front side.
When I make my next shime head, I'm going to make a clamping ring/stitching guide to hold that outer edge together firmly while I stitch, but I haven't done that yet, so I can't say much about how it's going to work except that 1) it has to make the job easier and faster, not slower or harder and 2) it has to be something I can construct for myself because I'll want an exact size for it.
Anyway...stitching is the most time-consuming phase of making a shimedaiko head and also makes for the most boring photographs. I hope these diagrams will be useful. I'm basically just doing a loop stitch each time and putting all the knots on the underside of the head.
After stitching close to the ring, make another row of stitches--but these can be a simple in-and-out "weave" stitch--about 1-1/2 inches away from the outside of the ring. At that point, you can take all the pulling-twine and mimi-sticks out of the operation, then trim away the excess hide--just to the inside of the inner stitching--with surgical scissors. Other heavy-duty scissors will work, but surgical scissors are the best.
Then make ten evenly-spaced 1/2-inch diameter holes around the edge between the inner and outer rows of stitches. I used a punch that came with a grommet-kit for this part. Be careful not to cut through any of the stitches--the holes will be VERY CLOSE to the stitching. Keep those hands steady!
Let the whole thing dry for two or three days before doing anything else to it. Haven't you done enough already? Once it's completely dry, ream the punched holes with a 1/2-inch drill bit, again being careful not to cut the stitches.
After all that, you can tie the thing to a 10-inch shimedaiko body and hear its lovely, bright, happy voice; a voice YOU brought into being.
That's the fun part.
Enjoy!


No comments:
Post a Comment