At this point, I’d like for any drum-maker to notice that the instructions I’ve given so far could be applied to several different kinds of drum. I’m going to continue with shimedaiko directions, but you could easily make a different type of drum by using the same methods, but putting the hide on any sort of hoop— wood, plastic, metal, whatever, as long as it’s a STRONG hoop—then securing it to the hoop in an appropriate way. I’d like to make these directions useful to anyone who wants to use them, so I want you to notice the adaptability of the methods.
For simplicity’s sake, we’re going to refer to the piece of dowel through the slots in the hide as a mimi. That’s Japanese for “ear”. It’s easier to use one word for these pull-points you just made. Lacing the mimi to tighten the hide to the ring is going to sound more complicated than it really is, but I’m going to give some explicit instructions about how to do it because if you get it wrong, you’ll have to undo it and start over. Following the complex instructions makes the actual work simpler because you’ll get it right on the first try.
Tool-pile at the ready. Bring on the hide...
 ...dripping wet.
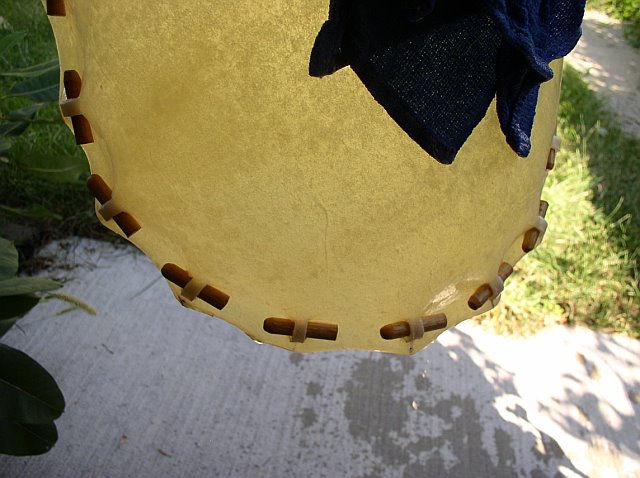
Lay the hide on your working surface with the smooth (outer) side down. Place the ring on top of it so that an even amount of hide shows all the way around the perimeter of the ring. You can coat the ring with your water-soluble lube first or just squeeze some on the ring, hide and all. It will wash out later.
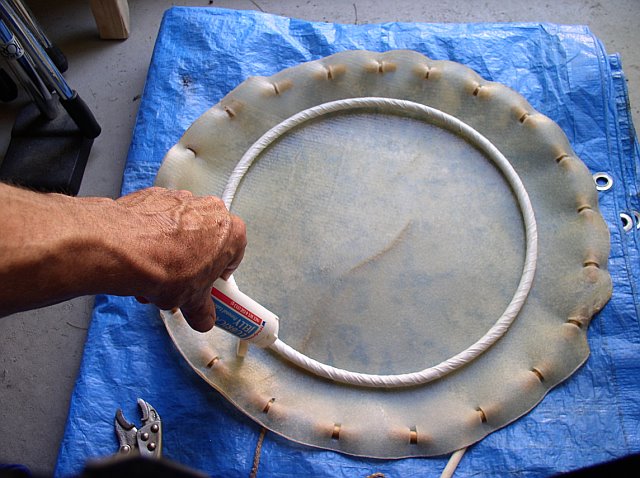
Take the section of the hide that is furthest away from you and fold it inwards over the ring. Call the first mimi that you grab “mimi number one”. (These directions are for a 21-pull head. Adjust as needed) Put the looped end of your pulling twine between the dowel and the hide to the left side of mimi 1 with the knot of the loop locked under the dowel, but the loop itself hanging free. Loop it clockwise (or start at the right and go counter-clockwise. All that matters is that you continue in the same direction once you start) around the mimi. Starting with the one you just looped (actually HALF a loop) count mimis clockwise until you get to number 12. Pull the twine (not tight yet!) to the right side of #12, loop it around clockwise to the left side, then go back toward the first one, but this time loop around #2. 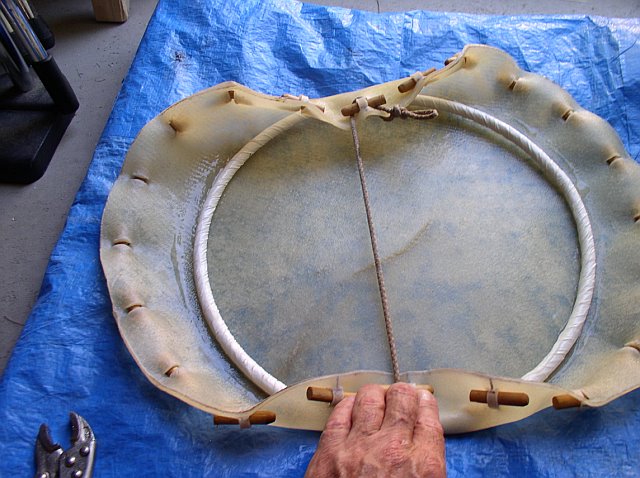
 Keep going in a clockwise pattern until you have the twine around every mimi, crossing from one side of the drumhead to the other each time.
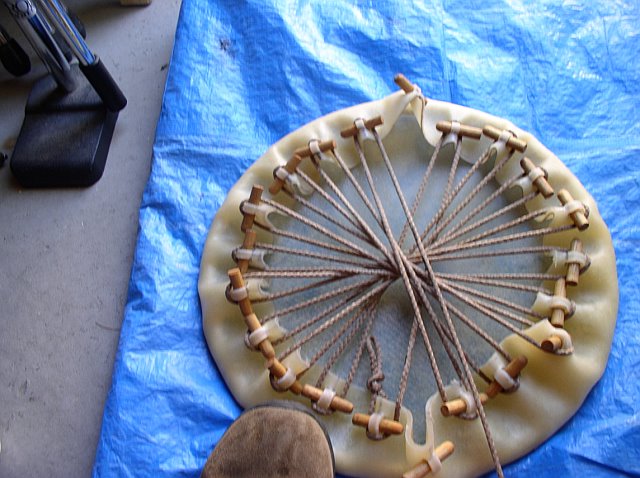
Here is the numeric sequence just to make sure you have it right, but really if you start right and you don’t skip any, it’s hard to do it wrong. Start at 1, then 12,2,13,3,14,4,15,5,16,6,17,7,18,8,19,9,20,10,21,11, then back to 1. Put the end of the twine through the loop you left at mimi number 1 and tie a temporary knot.
Numbering the mimis might make it sound over-complicated. All you’re actually doing is going from one side of the head to the other and back again, always in the same direction; in this instance—clockwise.
Now you can start pulling it tight, in the same pattern. I’ll tell you my method for pulling and hopefully it will make sense. I pull the slipknot right up against the first mimi, then go to number 12. I grasp the mimi with two fingers of one hand while I have the twine in the other hand. At the same time, I pull the mimi toward the center of the drumhead and the twine toward the outside, such that I am pulling my two hands away from one another, as if I was trying to pry an elevator door open. I keep the mimi that I’m currently pulling near the center of my body so that I’m pulling in both directions away from my center. I can get pretty good leverage this way. To clarify, the movement I’m talking about is just like this: make fists with your hands and hold them out in front of yourself with the backs of the knuckles touching. Then pull them apart—right hand to the right, left hand to the left. Now do the same with a looped piece of twine between them. Now do the same with the looped twine attached to a piece of hide. Congratulations! You’ve just learned to do something most people would be afraid to do! It really isn’t all that hard. Well, it isn’t the EASIEST thing in the world either, but…

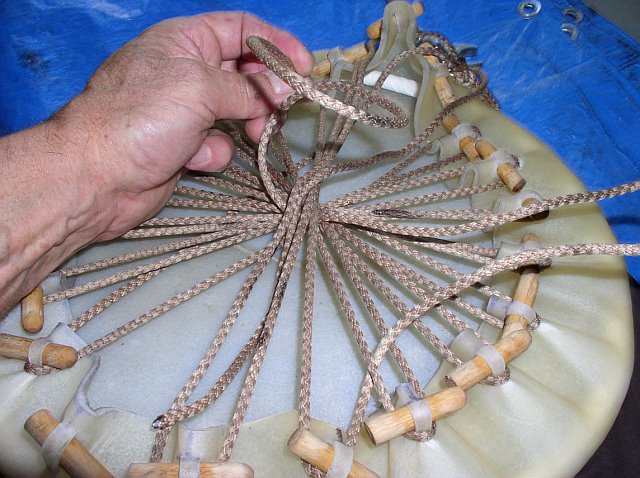
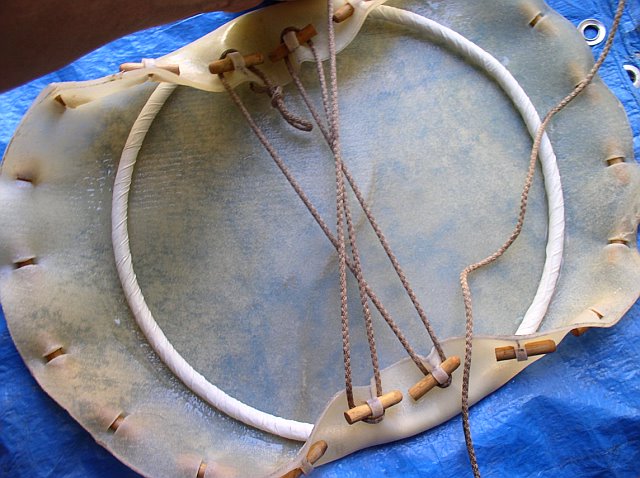
Once you have one section tight, you “lock it in” by wrapping it around the mimi. You’ll be keeping the tension on the twine with one hand throughout the process. You may have to work your way around the drumhead two or three times to get all the slack out, but with practice, you’ll be able to weave the twine in one pass, then tighten it in one more pass.
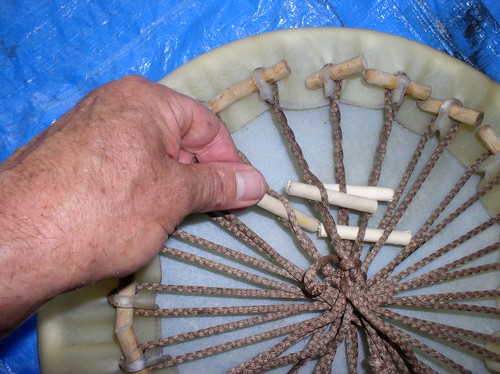
After you get all the way around—back to the loop at mimi number one—pull all the slack through the loop, make one last pull and tie a secure knot. Look at the folded edges of the hide. Most of the time, there will be an area that isn’t pulled in as much as the rest. Take some small pieces of dowel, put them between the two sections of twine that go to and from the mimi that needs to be pulled more and twist the twine together. Be careful not to scrape the hide much. I always round the ends of my twist sticks so I don’t inadvertently cut any hide—mine or the drum’s.
At this point, you can decide whether you’ve tightened the hide enough or not. It should feel fairly taut and it might even make a low tone if you tap it with your fingers (never hit a wet drumhead with a stick!) If it’s still too loose, you can twist more sticks into the twine, tap the mimis inward with a hammer and a small piece of dowel as a driver, grasp the edges and twist from playing-head-side to underside, pull on the twine more or any or all of the above. The wet hide will seem much looser than it will be after it dries (or you could say that after it dries, the finished drumhead will be much tighter than it was when it was wet) so at some point, call it good enough and slide the whole thing back into your soak tub, have a bit of tea or sake and get ready to stitch.


No comments:
Post a Comment