This article will be in three parts, posted consecutively here in my blog. I would try to do it all in one post, but I'm not sure if I can fit all the photos into a single entry. If you use these instructions, I'll be happy to hear your feedback and I'll try to make any additions or corrections that you might point out to me.
Anything that humans can do is a thing that can be done by any human who is able to take all the steps in the right order. That’s my message, even if you aren’t especially interested in making your own Japanese drums. Some tasks in any person’s life can seem daunting at first, but it always comes down to two decisions, then a third and so on. The first decision is whether you want to do a particular thing. Next is knowing the first step to take, then the next step and so on. Armed with that knowledge, never be afraid to try anything that you want to do. It’s only a matter of working through the steps.
The first step, as in most projects, is to gather all of the materials and tools you’ll need. Here’s my list:
A hoop made of round steel rod and welded or forged solidly (for the style and type of shime I’m making, I use a 14 inch hoop made of 3/8 inch rod. You could use ¼ inch rod for a decorative drum or one that won’t be played hard or ½ inch rod if you’re really hard-core)
A piece of rawhide (cow skin) at least 4 inches larger than your hoop—in this case, an 18-inch round. For a decorative drum, any hide will work. For a drum to be played lightly, you can use 4-5 ounce hide. For a drum to be played wadaiko-style, use 6-8 ounce or heavier hide with no holes or weak spots.
A tub large enough to soak the hide without bending it much, filled with…
Water. Use COLD water only and no additives. If the tap water in your area has a lot of chlorine in it, use a few tablespoons of baking soda to neutralize the acidity.
21 pieces of ¼ inch dowel about 1-1/2 inches long with one end rounded smooth.
A ½ inch wood chisel
A hammer—your constant companion during all phases of this project. Be comfortable with your hammer.
A disposable piece of plywood or paneling that you can lay the hide on to cut slots with the chisel.
About 20 feet of heavy twine. The right twine should not a) break no matter how hard you pull it apart with your hands or b) cut into your hands as you test it by pulling.
Teflon tape or smooth-finished water-resistant duct tape (I use white duct tape)
KY jelly—doesn’t need to be spermicidal for this purpose.
That’s all of the “phase one” supplies, but phase 1.1 will be done right after phase one, so have all of THIS stuff ready as well:
A fine-point wood punch/ awl
About 18 feet of artificial sinew—“natural” color.
A heavy-duty sewing needle with an eye big enough to thread it with artificial sinew.
Your hammer and disposable plywood working surface from phase one.
Tough hands or leather gloves on your strong hands.
The patience and determination of some mythical drum-making creature. This project will take most of an 8-hour day. Dry hide is very difficult to work and hide that has been kept wet for too long will begin to mildew or worse. Don’t start this project unless you have the time to finish it.
It starts with wanting a new shime head and not wanting to pay the big bucks to buy one from someone else. Making shime heads is a very labor-intensive job and people want to get paid for their work, so shime heads can be expensive if you buy one from a professional shime head maker. You look at a shime and you see its elegant simplicity and you say to yourself “How hard could this be?” You’re about to find out…
The next step is shopping for rawhide. I’ve gotten some good hide from Tandy Leather Factory, but not every piece of hide I’ve gotten from them has been very good. From some suppliers, it is better NOT to buy it without looking at it first. If you buy hide from Stern Tanning, they understand drum-making and you can count on getting the good stuff. Specify the weight you want when ordering. Rawhide weight refers to the average number of ounces an average square foot of the hide will weigh. Taiko-grade rawhide will weigh at least 6 ounces per square foot, but heavier is better.
Then…waiting. While you’re waiting for your hide to arrive, either make or have someone make a 14 inch steel ring out of ¼-inch to ½-inch smooth round steel rod. I use 3/8” rod and it works well. If you make your own, the length of the rod is this:
14-inch diameter multiplied by pi (3.14)
I give this common formula for two reasons: you might want to do a custom size—for a bigger or smaller shime or an okedo and you will need to determine the spacing for your pulls and the length of the piece of sinew you’ll use to stitch the hide onto the ring. And because you’ll need something to do while you wait.
I’m waiting right now, so I’m writing out these directions. My 18-inch round is soaking right now and it isn’t quite pliable enough yet. It takes a good 24 hours of soaking for heavy hide to get soft enough. It should be as pliable as an udon noodle. You should be able to fold it back on itself in a tight loop without ANY pressure. Do not bend dry hide! It will crack.
Properly soaked hide will be about twice as thick as it was when dry. Oh, one more thing: Natural rawhide is much stronger, more durable and thicker than bleached rawhide. I always use natural because I want my drumheads to last as long as possible. My group is pretty rough on drumheads. We hit HARD. I want all of our drums to be as strong as I can make them, so we can play as hard as we want.
I might be going on a little too much about soaking, but…natural rawhide will usually have some small variations in the density and these will show up during soaking as lighter and darker areas. If it’s well-soaked, the whole piece should be uniformly opaque—you’ll be able to see through it. If it has some spots that still look whitish and non-opaque, it will need to soak a little longer. Soak time for heavy rawhide will be at least 20 hours, but not more than 30 hours. Your actual soak time will be determined by pliability and opacity, not really by time, but keeping it wet too long can cause mold, rot or other unpleasant things. Keep curious dogs away from rawhide at all times. Dogs understand snacking, but they don’t understand drum-making.
Once your round has soaked completely, you might notice that it has grown slightly and it may not be as round as it was when it was dry. That’s normal. That’s also why I told you about calculating a circumference and why the next step is done after soaking.
You’ll need to mark out some evenly-spaced holes for the places to pull the hide tight onto the ring. If you’re making a 14-inch head (for a shime with a 10-inch body) the measurements I’m going to give will work. Otherwise, multiply the diameter by 3.14 and divide that product by something between 2.5 and 3 until you get something close to a whole odd number. I mean an odd number without a fraction.
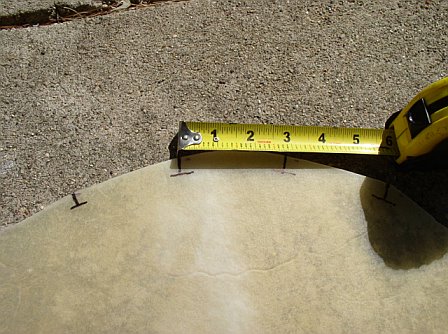
I decided in advance that 21 pulls would be about right for a 14-inch head and that they would be spaced about 2-7/8 inches apart. My hide started as an 18-inch round when it was dry and grew to 19-1/2 inches wet. 19.5 times 3.14 equals a circumference of 61.23 inches. If I divide that by my pre-selected 21 pulls, I know I’ll have the center of a pull every 2-7/8 inches around the circumference and I can mark these out with a Sharpie like this:
 Note: It does need to be an ODD number of pulls so that you can tie the end of the pulling twine back to itself.
 Wipe the excess water off of the hide so you can make marks on it. Pencils, crayons and ball-point pens won’t make a mark on wet hide at all, so I use a felt-tip permanent marker. The outer edge will get trimmed off later. Look at both sides of the hide. One side is smoother than the other. The smooth side will be the outer side on the finished drum; the smooth side is the playing surface. Keep track of which side is which during the next few steps.
A note here on how I like to work: I make my calculations and my marks before I do any cutting for a very simple reason. I don’t want to handle too many tools or do too many separate operations at the same time; while I’m marking, I only want to handle my tape measure and my marker, then when I’m cutting, I only have to concentrate on my hammer and chisel. For this reason, I do only one step at a time. That keeps it simple and manageable for me.
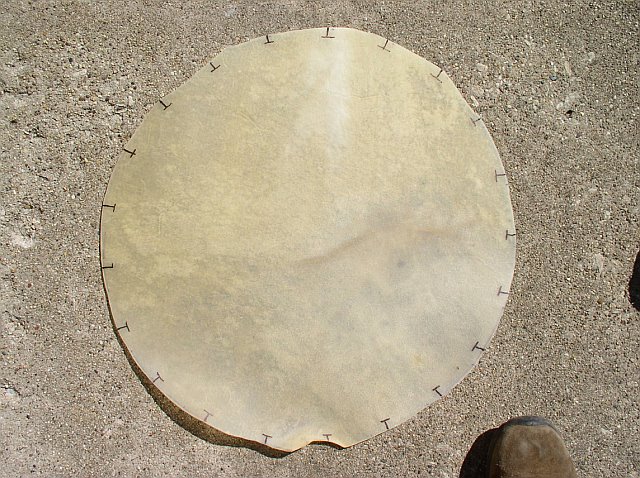
With that in mind, after I mark the spacing of the slots I’m going to make, I mark another set of lines about 3/4 of an inch off the edge of the hide, so that the two marks—in a T shape—tell me exactly where to place my chisel each time. Using pieces of dowel to tension the hide onto the ring is my “innovation”. The articles I’ve seen about making shime heads have said to merely put the twine through the hide, but I find that most twine will rip the hide if I pull it very tight. One article even said to use fishing line to pull the hide tight onto the ring. Ouch! I do not recommend using fishing line for this job at all. I use ¼-inch twine made of a cotton/poly blend and it doesn’t hurt my fingers to pull on it. I don’t believe in hurting myself to make a drum.
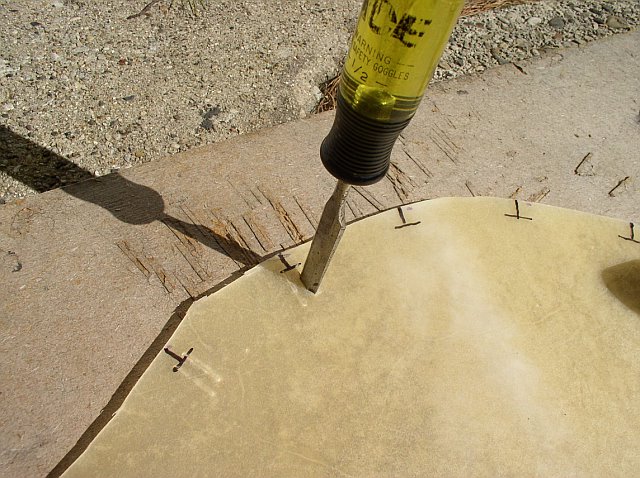
Once I have all my marks, I use my hammer and wood chisel to cut a pair of slots at each place I’ve marked. For this particular head, I make these slots ½-inch long and ½-inch apart. The slot needs to be about twice as long as the diameter of the piece of dowel. Since I’m using ¼-inch dowel, I make ½-inch slots. For 3/8-inch dowels, I’d make ¾-inch slots.
 After all the slots are cut, I begin pushing the dowels through them. I start from the smooth side—with the hide back in the soak-tub so that the slots are nice and slippery. With the smooth side up, I push a dowel into one slot, then back out through the next slot ½-inch away. They should fit snug, so it will be kind of hard to push the dowels through the slots. The water helps; so does giving the dowel a little twist on the way through. Sometimes I put the hide against the edge of the tub to help me push. Just 21 of these dowels to push, then I can move on to the next step.
 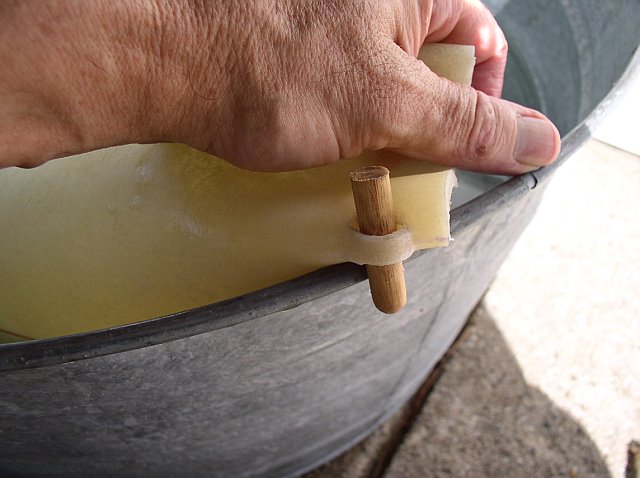 Once all the dowels are in and the hide is once again resting in the soak tub, the smooth side should look like this:
 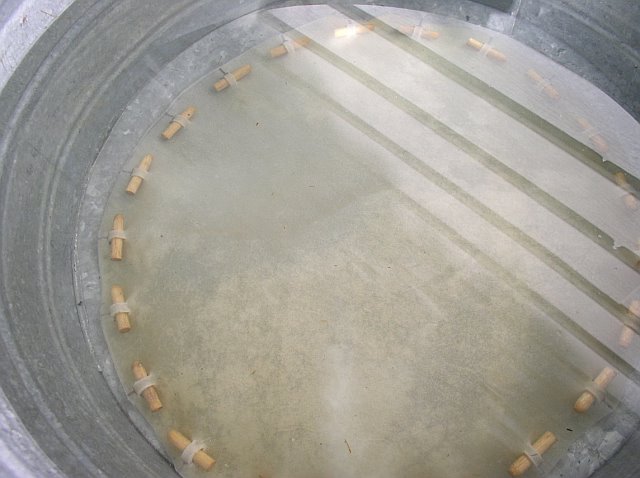 with the ENDS of the dowels protruding, while the rougher side should look like this:
 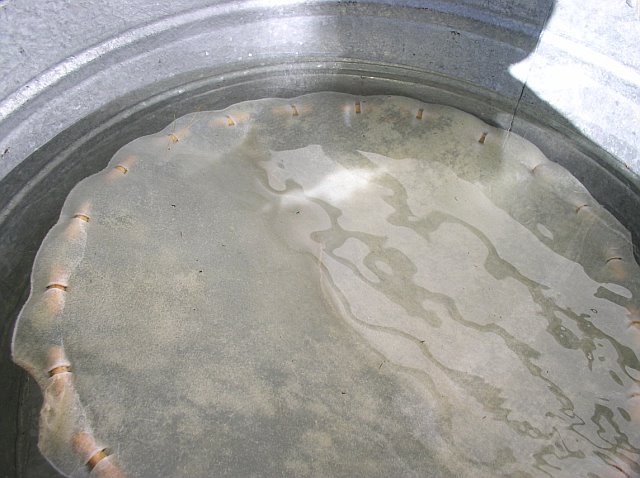 with the back side of the hide-loop and the middle of the dowel visible. To continue, click the link that says "next post-- making heads for shimedaiko part 2"


No comments:
Post a Comment